

The engine arrives
22nd May 2005
It's finally here! The beast has a heart! Spent a very exciting weekend fitting the biggest part to the car - a very shiny 3.5l Rover V8.
The engine arrived on Friday, a good two weeks ahead of the expected date. Apparently when I said that I was ready for it "anytime from now on", that was kindly translated as "soon as possible" and with some reordering of the supply queue I jumped ahead of someone else to receive it just 2 weeks after placing the order. This was fantastic from the point of view of customer service, but meant I had to make a number of phone calls to arrange the bits I would need when it arrived.
From Pilgrim I ordered the gearbox cross-member (which it turns out should have come in the starter pack I bought, so became a welcome freebie), brackets for the alternator (likewise missing originally and therefore no charge) and the propshaft and fuel pump. The only part Pilgrim couldn't supply were the rubber mounts the gearbox sits on. Apparently they never have supplied them, relying instead on you going to a specialist Rover V8 company to source them yourself. I bit odd in my mind, but I set about trying to find a set. The first people I called were Rimmer Bros who wanted £32+VAT for a pair, but were out of stock, so I tried RPi who wanted an incredible Ł90+VAT (in hindsight I can't believe they had quoted for the right parts)!!
Fearing I would be delivered an engine I couldn't fit for the sake of two rubber blocks I tried Jim Robinson who was supplying my engine. He was very helpful and even had a couple left in stock explaining they are becoming extremely rare and hard to come by as Rover stopped making them a long time ago and the aftermarket copies are rubbish. He offered to stick them in the crate with the engine and I could send him a cheque when it all turned up. Jim also gave me a few pointers about the engine and said I was to phone him to let him know it got delivered safely and if I had any problems.
That sorted, I organised an engine hoist from the local HSS and set about making some space in the garage for the engine crate.
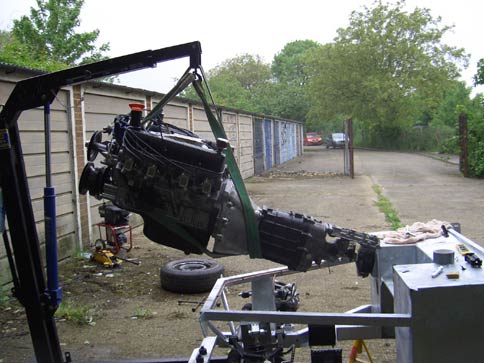
On Friday morning the guy from delivery company arrived with my engine - very exciting! As I hopped into the truck and directed him to my garage we got talking - it turned out he was a big cobra fan, his mate even owned a real AC 427. He dropped the engine off and had a look around my chassis before leaving me to open my new present. The crate was a work of art in itself, superbly well built and everything packed properly inside to stop it crashing around. Opening the lid I got my first close up look at the new engine. If the outside of it is anything to go by then this engine is going to be a real beauty. Jim has done such a good job cleaning it and prepping it that it looks brand new. All the important holes were taped up to avoid contamination, hose connections were labelled so I'd know what connected to where and there was a wallet with instructions and diagrams and a complete list of the parts replaced during the rebuild (which seems to be just about everything). I cannot describe how pleased I am with it.
First job was to reconnect the gearbox with engine block (it was unbolted to make packing easier). This was just a case of lining up the gearbox shaft with the clutch plate and pushing the two together before bolting the two halves. Next job was to bolt the engine mounts on then finally slip the gear level off to make fitting easier and it was ready to lift.
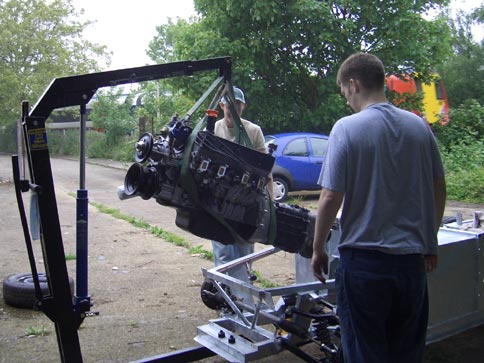
Saturday arrived and my friend Chris was down for the weekend, so I roped him and my fiancée Nora into helping with the engine. Despite dodgy looking weather we decided to push the chassis outside so we would have plenty of light and space to work with. We wrapped the sling around the engine and lifted it into the air. The engine slid in pretty easily and (after removing the steering rack for better clearance) dropped into the mounting holes with a small amount of work with the jack under the gearbox to get the angle right. Feeling very pleased it had gone so smoothly, I decided to check that the propshaft would fit. Disaster! The propshaft was about an inch too short, they was no way it'd bolt on! I decided that the engine needed to go back another hole in the chassis mounting bracket, so after an hour of heaving the engine back and forth and eventually having to unbolt the chassis mounts, bolt them to the engine then bolt them back to the chassis when the engine was dropped in place we had the engine as far back in the bay as was possible.
A quick test with the propshaft and...crap! It was still 1/2" short. We looked again at the mounts and the engine, but there was physically no room for the engine to go any further back. I gave Tony at Pilgrim a quick call and he calmly explained that if I pulled the end of the propshaft hard enough it would extend a good 6 inches. Feeling a bit sheepish I relayed this to Chris and Nor and received a suitable number of groans and "you idiot!"s in return. Still, at least the problem was solved. As the heavens started to open we pushed the car back into the garage.
I spent the rest of the afternoon wrestling with the gearbox cross-member. Although the manual recommends fitting it before you drop the engine in, I couldn't see any easy way of drilling the necessary holes through it to line up with those on the chassis with it fitted first. Instead I follow Mark Evans' example, using some masking tape and a pencil to mark out the holes, then drilled them and finally bolted it in place.
Next job was to fit the clutch cable. The bellhousing and clutch release fork had already had the necessary holes drilled in them by Jim (the Rover V8 originally had a hydraulic clutch and some alterations are necessary to make it work with a cable) so fitting was straightforward. However, pushing on the clutch pedal didn't give me much confidence that the cable was disengaging the clutch. In fact, it felt a lot like I was just streching/damaging the cable. Having pondered for a good hour about how this was supposed to work and therefore, what I might have done wrong I still couldn't figure it out, so decided to try something else.
I reattached the steering rack then painted up the alternator brackets and worked out how they would fit together (need to get hold of some more nuts and bolts). Then I tried to figure out where and how the ignition coil should be attached, but by then I was quite tired and decided to make a list of the nuts and bolts I needed to order and call it a day. Once I've figured out the clutch cable, the next job will be starting on the wiring and the fuel lines. Need to get hold of a battery and some suitable cable for the starter motor.
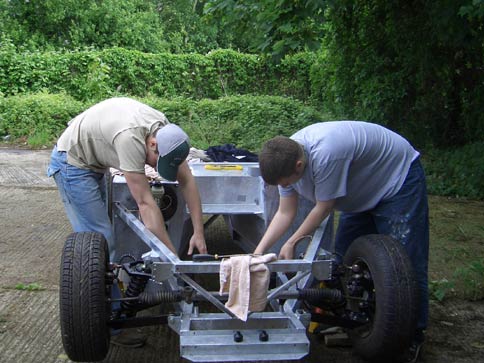
The chassis gets
an airing
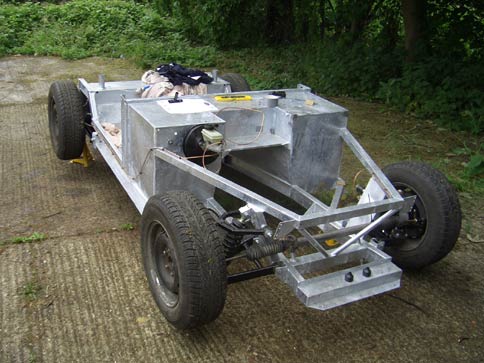
Fitting the chassis
engine mounts
Ready for insertion
Is that really going
to fit in there?

Obligatory and excessively cheesey picture!