

Front suspension
17th October 2004
Nearly three weeks has passed since the chassis arrived and progress has been a mixed bag of fortune. I haven't got round to the reassembly of the rear brakes, the lure of working on the chassis was too great. The first job on which was to seal it with polyurethane sealant. This is necessary because where the sheet metal is welded to box section, the heat of welding distorts the panel and creates gaps between it and the box section. Also, there are numerous holes in the chassis to allow the zinc to flow into every corner in the galvenising process all of which would add up to some soggy carpets if they aren't sorted out.
The first problem was I couldn't figure out how to get the bloody sealant out of the tube! Now, you may laugh, but it took several attempts and a posting on the CRC forum to figure out the bottoms of the tube aren't sealed as they appear, but actually prise off to reveal the plunger which can be operated by a standard cartridge gun. Feeling slightly sheepish (and questioning whether building a whole car was actually a good idea after this cock-up) I started on the chassis. After many hours of squeezing, wiping and more squeezing I was utterly bored with this job. Everytime I filled a hole, I found two more that needed doing. And it's not only the amount of holes, it's trying to guess which need filling and which need to be used for mounting things - like the seatbelts. I've done as best as I can, and I'll fill the rest as it becomes clear whether they are useful or not.
Having got (most of) the sealing done, I started on what I considered the first proper job of the build - mounting the front suspension. After painting the wishbones up I looked at the build manual. Step 1, fit the bushes to the wishbones. Having read others' experiences and watched several episodes of the "...is born" programs I knew this wasn't going to be an easy job. On the build video you get a brief shot of Mark Evans banging the bushes in with a large socket and hammer. I didn't have a large socket, but I did have the "mushrooms" Pilgrim supply for the front uprights which happen to be exactly the right size and instead of resorting to the hammer I thought I seen a better technique. Basically, put some threaded bar through the bush and mushroom with a couple of nuts and washers either side and tighten up until the bush is in position. Fine in theory, but as I didn't have any threaded bar to hand, I decided to use one of the bolts supplied with the kit and instead of wasting a Nyloc nut, I recycled an old one off one of the donor parts I no longer needed. This worked really well for seven of the eight bushes, but on the last one the decision to use an old nut and a new bolt turned out to be a bad one. The nut thread gave way and ended up cross-threading/destroying the thread on the bolt. Fortunately by this point the bush was in far enough to use the hammer to finish it, but the damaged bolt (which I now think is for holding the steering rack on) will have to be replaced. Anyone wanting to try this technique (and it does work for most of the time!) is advised to buy some M12 threaded bar and nuts from their local DIY store.
I attached the balljoints to top and bottom wishbones. Then removed the top balljoints and reattached them with the locknuts in place (Why don't they mention that in the manual?!). Then they were ready for mounting on the chassis. For reference, the holes need a 12mm drill to clear the excess zinc.
Fortunately mounting the wishbones is a simple task, just bolting them in place with the correct nuts and bolts. I was worried that I wouldn't pick the right nuts and bolts because the bag supplied had so many, but it turns out that it's pretty obvious which are which. The manual says to pack the top wishbones with washers "as required" for setting up the suspension geometry. When I offered mine up there wasn't room to fit a cigarette paper nevermind a washer, so I've gone for the default settings for now and I'll see if the bushes settle once the car is on the ground with its full weight.
Next came the suspension struts. After a short 24 hour delay while I waited for the Hammerite to dry on the bottom brackets that I had forgotten to paint, I was ready to put the struts together. Being height adjustable there's no need for complicated spring compressors, just set the height to its lowest and the springs fit onto the struts with room to spare. I had to enlarge the holes in the lower wishbones using a 10mm drill in order to allow the bolts to go all the way through. I thought at first I might have been using the wrong bolts, but I've double and triple checked and I'm sure they're correct. Why the suspension brackets have larger holes than the wishbones is a mystery, but I'm not going to worry about it. I bolted the suspension struts to the lower wishbone and then the chassis on both sides without trouble.
The final job was to fit the front uprights. These require the bottom holes enlarging to 14mm to fit the lower balljoints. Again, for reference 14mm drills are not available at any of the normal DIY shops! I finally found one in a local hardware store, but it wasn't cheap. If I'd had the time I would have ordered a set of large drills from the Internet. I test fitted the uprights and admired how these few bits had started to make the front look more car-like. I can't fully bolt them on yet as I need to set the camber correctly by adjusting the top balljoint.
With the front suspension in place I tried to sort out the steering rack. This was covered in road muck, but no rust as it's aluminium - the quickest clean-up job on this project so far! Getting the old track rod ends off required the purchase of a blowtorch to loosen the locknuts, but it made the job extremely easy once the nuts were hot enough. I haven't got round to test fitting it yet as I have more pressing issues looming.
My mate is coming down for the weekend next week and he's keen to lend a hand, so I'm hoping we can assemble the rear suspension which looks like a two-man job on the build video. This means I've got a week to strip, clean and regrease the driveshafts; check, clean and paint the differential; and fit the bushes to the diff carrier. I've also got to order some new bolts and washers for the CV joints to replace the ones that got damaged stripping the rear suspension arms. If I don't make it then he's going to have a very dull weekend with a tin of Hammerite or possibly a tube of sealant!!
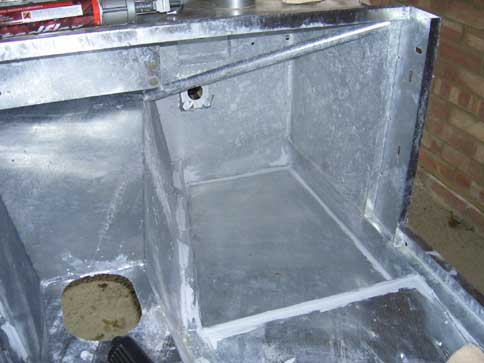
Think this picture is boring? Wait until you do the job!
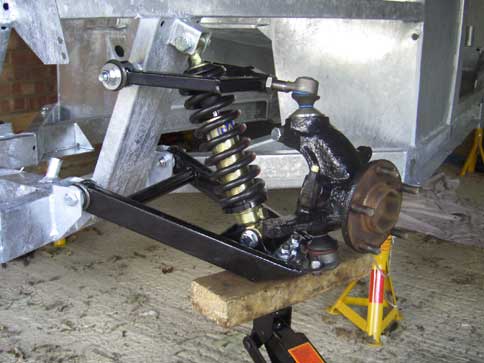
The front suspension