

It fires!
13th July 2005
Yes, the big news this week is I have a roaring V8 officially tried and tested in my car. Still sends a shiver down my spine thinking about it!
Having got so close the other weekend, I made a concerted effort to get the final bits and pieces necessary to start the engine finished. I made a trip back to the shop I bought the heater hoses from and bought a set with smaller diameter (5/8") in order to finish off the plumbing. Trying to fit them I decided that the fittings on the engine really should have had the bigger 3/4" hoses as it was a very very tight fit. Unfortunately the hose adaptors Pilgrim supply are designed to go from 5/8" to 1/2" (the diameter of the heater's outlets) so I had no choice but to struggle them on. It was at this point I discovered I'd order the wrong size hose clips ARRRGGHH!! There is nothing more frustrating than thinking you've got all the right bits and finding one tiny piece that's wrong! Mental note to go to the shops again made, I moved on.
In order to finished mounting the radiator I had needed to make up some brackets and find out what size nuts the rubber bobbins needed. After asking the supplier (who had no idea) I turned to the forums again. The answer (as it turns out) is 5/16" UNF. Why exhaust bobbins are still made with imperial threads in this day and age I can only guess at, but during the week I ordered a set of four from Margnor along with some other assorted bolts and nuts I'll need later on.
Back in the garage, swearing and sweating in equal measures (it was hard work getting those hoses on and I've got the scraped knuckles to prove it) I made up some brackets to mount the top of the radiator. These were very simple, just bent two bits of steel 90 degrees and drilled two holes in them. They were then attached in place - bolted at the top to the bobbins and screwed into the chassis at the bottom. They hold the radiator nicely in place, but there's a bit of flex in them - hopefully enough to stop the radiator ripping itself to pieces over potholes, but not too much to become a problem for the SVA .
The coil needed wiring up so the plugs could spark. On the Pilgrim wiring diagram they show that the coil should have a ballast resistor fitted. I assumed that the metal box the coil was attached to contained the resistor, and following the diagram from there left me with two wires and three places to connect them. I posted a message to the forum and Jim Robinson kindly replied, gently pointing out that I had it all horribly wrong! A quick call to him later and I understood that the box is in fact an ignition amplifier and the coil he uses doesn't need a ballast resistor. All you need to do is wire the positive wire to the '+' terminal and the negative wire to the '-' terminal. Couldn't be simpler! I duly shortened the loom wires and attached them onto the coil.
While I was replacing the heater unit's old crusty hoses I got a dribble of murky brown water deposited on my feet. I figured it would be worth flushing it out before I connected it to my shiny new engine's cooling system so added some cleaning fluid to the shopping list and headed to the shops.
A trip to Halfords got me some bigger hose clips, a 10 litre plastic water container with a screw top, a 5 litre bottle of anti-freeze and some radiator flush. That sorted the hoses and the problem of getting the fluids to the car. Using a cunning system of funnels, lemonade bottles, warm water and radiator flush I ran a good 10 litres of water/flush mix through the heater several times in both directions. The flush collected a good selection of rust and gunge, but nothing too dreadful and at the end it was clean water in, clean water out. Job well done!
I placed heater in the car (I won't attach it until I know where the dashboard is going to sit) and connected all the hoses together. Now came the big moment, filling it and firing it. In order to avoid wet feet I closed the drain plug screws on the engine block and with the help of my fiancée I started pouring in water and anti-freeze into the header tank. After just 3 litres had gone in the tank was full. I scratched my head and decided that the reason must be the top engine hose being higher than the tank was preventing the block being filled. Sure enough, pushing the hose down produced a bit of a "burp" and the expansion tank was half emptied. I decided to open the drain plugs on the block again so I could see it was being filled. Using a funnel with an extension tube I poured some more water in keeping the funnel higher than the engine.
This worked well for another 3 or 4 litres and the drain plugs started to dribble then pee coolant on the floor. After closing the plugs I figured I still had 5 or 6 litres still to fill. After just 1 litre the tank was full again and pushing on the top hose wasn't doing much. I adopted a technique you probably won't find in the Haynes manual and using my lungs via the funnel's tube applied air pressure to the tank. This did remarkably well and allowed me to put some more coolant in (in between blowing it round the system!) until I had a total of 9 litres(ish) in the system and the expansion tank was only half full. I figured that that was probably good enough and once the engine was pumping water itself, any air locks would be sorted out and I could top up the expansion tank as necessary.
So, the only thing left was to try the ignition. My other half took charge of the key, while I positioned myself over the carb, with one hand on the choke lever and the other on the accelerator lever (I haven't fitted either of these cables yet). First attempt - the fuel pump started whirring, the fuel filter in front of me filled up and the engine turned over on the starter. A couple of coughs and splutters (cue frantic choke/throttle action to try and get it to catch), but no joy.
Second attempt - Fuel flowing, starter engaged...NOOO!! Battery is giving up and fails to turn the engine properly. Some quick thinking and my other half's Ka is surgically attached via some jump leads. Second attempt (second attempt) - Fuel, starter, plenty of coughing and black smoke then VROOOOM!!! It caught magnificently, all cylinders were firing and the noise was frankly incredible. Give a little blip of the throttle and a cloud of exhaust fumes, flames a foot long either side of the block and a glorious roar are given in return. At this point I signal to my fiancée to turn it off and we cough and splutter ourselves through the carbon monoxide that's now filling the garage out into the fresh air, me with an enormous grin on my face!
Yet again I'm really impressed with Jim's work and still can't believe it was that easy to get going. And it sounds strange, but now it has dawned on me that I really am building an actual car that will actually go on the public road and I'm actually going to be relying on those nuts and bolts I've been screweing together for the past 9 months (eek!). I've got a few wires to tidy up, the choke and throttle cables to fit and the exhaust headers when they arrive (which should allow me to give it a little drive without singeing anyone), but that's pretty much it I think for the rolling chassis. Next part is bodywork!

Heater hose runs
under manifold...
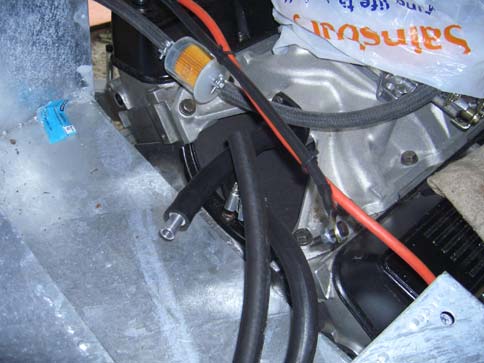
...to pop out here
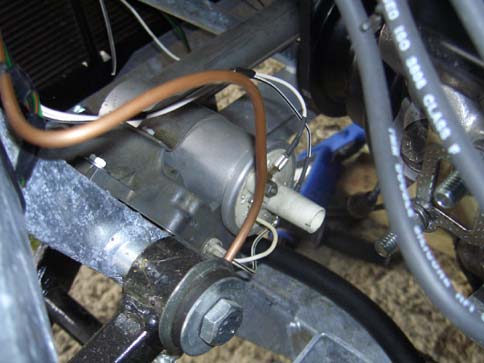
Electrics - simple when
you know how